|
Gadget & Technology - Last Update: February 2026
ACwifi 路由器技术分享 (Chinese)
Apple Insider
Digital Photography Review
GizChina
GsmArena
IT之家 (Chinese)
Linus Tech Tips Forums
SmallNetBuilder
StorageReview
TechPowerUp
The Register
UFO Test - Multiple Framerates
VideoCardz
Windows 10 Help Forum
Windows 11 Help Forum
Windows Central
XDA Forums
- 6 hacks to reclaim your YouTube experience (and your sanity)
- Install 3D Pinball Space Cadet on Windows 11
- Install Microsoft Teams (personal) in Windows
- Make Redmond angry by setting up Windows 11 with a local account
- Make Windows 11 more useful and less annoying with these 11 Registry hacks
TelegramBot - Babelgram
Language Exchange Made Simple. You can type in one language, and it’ll instantly translate it into the other.
TelegramBot - DropMail.me
Tired of spam cluttering your inbox after signing up for a website? DropMailBot offers a quick solution by generating temporary email addresses that disappear after a set time.
TelegramBot - File Converter
Have you ever needed to convert a file from one format to another? Maybe you downloaded a PDF but wanted to read it on your phone, or you recorded a video but need it as an MP3 for your podcast. The File Converter bot helps you change files into different formats, making them compatible with various devices and software.
TelegramBot - All-in-One AI Chatbot (ChatGPT 5 | Gemini 3 | Nano Banana)
This versatile Telegram bot provides access to advanced AI models like ChatGPT, Claude, Gemini, and more, all in one place. It supports text conversations, voice inputs, image generation, web searches, and creative tasks.
DNS Server (general)
CloudFlare: 1.1.1.1 & 1.0.0.1
[ Private DNS: one.one.one.one | https://cloudflare-dns.com/dns-query ]
Google: 8.8.8.8 & 8.8.4.4
[ Private DNS: dns.google | https://dns.google/dns-query ]
Quad9: 9.9.9.9 & 149.112.112.112
[ Private DNS: dns.quad9.net | https://dns.quad9.net/dns-query ]
DNS Server (with ad filter or more)
AdGuard: 94.140.14.14 & 94.140.15.15
[ Private DNS: dns.adguard-dns.com | https://dns.adguard-dns.com/dns-query ]
ControlD: 76.76.2.2 & 76.76.10.2
[ Private DNS: p2.freedns.controld.com | https://freedns.controld.com/p2 ]
DNS-Over-HTTPS - What and How?
| Apple/iOS settings
| Other DNS Providers
Firewall Hardware:
Firewalla |
OPNsense for DIY setup
Backup Rules 101

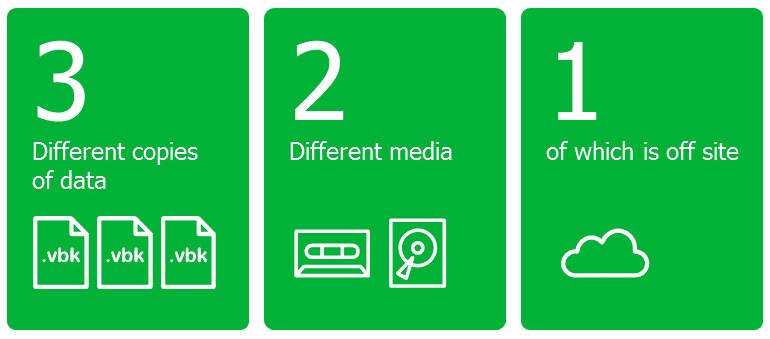
Remember the backup rule 3-2-1. Three copies of your data (one in use plus two more copies), on two different media, and one copy off-site.
Google - How to stop obnoxious google sign in prompts?
There's an option to disable the "signing in with google" prompt, but for whatever reason, the setting is hard to find (the location of the setting is not intuitive for most people).
1. Go to "My Account" ➜ "Security" ( https://myaccount.google.com/security )
2. Click on "See all connections" link in "Your connections to third party apps & services"
3. Click on the gear at the top of the "Third party apps & services" page
4. Disable the "Signing in with Google" prompt
Instagram Reels is not loading/Reels is not working/Reels is stuck in a black screen on Windows on any browser (Edge Firefox Chrome Brave)
1. Start ➝ Run ➝ SystemPropertiesPerformance.exe
2. On Visual Effects tab, try ☑ "Animate controls and elements inside windows"
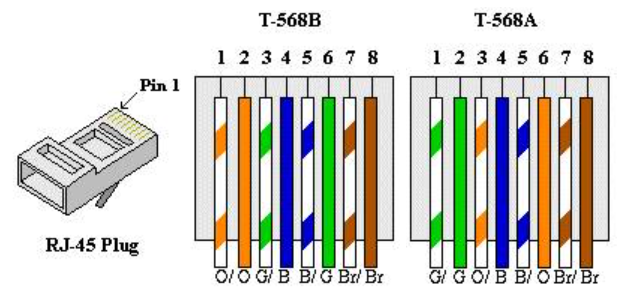
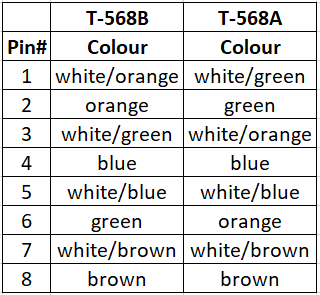
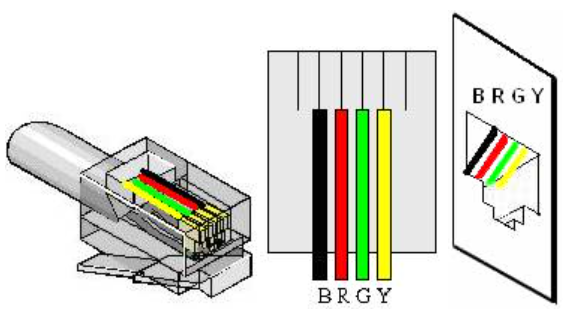
Network Wiring 568A/568B for RJ45 & RJ11


The POTS (Plain Old Telephone Service) residential telephone wiring generally contains two pairs of wires - designed for two separate telephone lines. The center pins (Red and Green) contain the first telephone line.
Telegram: SMS Fee - Possible Skip Method That Might Work For You
1. Once this page has been displayed, close Telegram
2. Clear all your RAM
3. With the mobile line that you use for Telegram, buy a Data Plan (if you didn't have it already)
4. Turn off your WiFi
5. With your Mobile Data on, reopen Telegram & try signing up.
uBlock Origin - Youtube Filter
! YT Control the number of videos you see per row:
www.youtube.com##ytd-rich-item-renderer:style(--ytd-rich-grid-items-per-row: 4)
! YT Makes "large player" / "theater mode" full height (minus the page header)
youtube.com##body ytd-watch-flexy[theater-requested_]:not([fullscreen]) #player-theater-container:style(height:calc(100vh - 56px) !important; max-height:calc(100vh - 56px) !important;min-height:calc(100vh - 56px) !important; )
! YT Set default playback speed:
www.youtube.com##+js(trusted-set-session-storage-item, yt-player-playback-rate, '{ "data": "1.75" }')
Note: You'll need to check "Allow custom filters requiring trust" if you haven't already.
! YT Remove unnecessary playback speed from menu:
www.youtube.com##.ytp-menuitem[role="menuitemradio"]:has-text(/^(?:0.25|0.5|0.75)$/)
||*.example.com^$script
||*.example.com^$inline-script
➝ Disable both external and inline script for subdomains *.example.com but not example.com
example.com##+js(acis, ETexample) ➝ blocks ETexample() function
example.com##+js(acis, $, ETexample) ➝ find $() and blocks any ETexample
➝ acis.js - aborts execution of inline script
example.com##^script:has-text(ETexample) ➝ blocks all script has the text ETexample anywhere
uBlock: Resources Library
uBlock: Static filter: Extended syntax
Google: https://www.google.com/search?q=%s
DuckDuckGo: https://duckduckgo.com/?q=%s
WhatsApp - Message Format
Bold ➜ use *text*
Italics ➜ use _text_
Strikethrough ➜ use ~text~
Monospace ➜ use ```text```
Bulleted list ➜ use * text
Numbered list ➜ use 1. text
Quote ➜ use > text
Inline code ➜ use `text`
Windows: Automatic Login to Windows
1. Start ➜ type 'netplwiz'
2. Clear the 'Users must enter a user name and password to use this computer' checkbox
3. In the following dialog box, enter the user’s password twice and click OK
Windows: Bring Off-Screen Window Back Onto Screen
Fix 1 - Show Desktop Togger
Hold down the Windows Key, then press “D“. Repeat these steps to see if it makes the window you are looking for reappear.
Fix 2 – Move Option 1
Select the program in the task bar.
Hold the Windows Key while pressing Left Arrow or Right Arrow repeatedly to move the window back into view.
Fix 3 – Move Option 2
Hold down the “Shift” key while right-clicking the program in the taskbar, then select “Move“.
Use your mouse or the arrow keys on your keyboard to move the window back onto the screen.
Windows: Restart / Shutdown via Task Scheduler
Ways to open Task Scheduler:
1a. Windows key + R to open the Run command. Type taskschd.msc and press enter.
1b. Windows key + S to open Search. Type Task Scheduler and click open.
Once you got Task Scheduler to open.
2. Right-click on the Task Scheduler Library and select New Folder. Name the new folder as Schedule Reboot or anything you like and click OK.
3. Expand Task Scheduler Library and select the Schedule Reboot folder. Then right-click on it and select Create Basic Task.
4. When you select Create Basic Task, it will open a wizard. Name it Reboot and click Next.
5. The Trigger section lets you decide when your task needs to be run. You can schedule reboot daily, one time, weekly, etc. Select daily and click next.
6. Specify the time at which you want to run the reboot and click Next.
7. In the Action section, select Start a program and click Next.
8. Type shutdown /r in program/script field and click Next. (other commands are listed above)
9. Windows may prompt a message box asking for permission. Click yes.
10. Click Finish to complete the task.
Windows: Useful Command / Location / Shortcut
assoc - to displays or modifies file extension associations
chkdsk - for diagnosing and repairing disk-related issues
cleanmgr - disk cleanup
"dir /b /s > dirlist.txt" - to displays a list of files & subdirectories
diskpart - to helps you manage your computer's drives (disks, partitions, volumes, or virtual hard disks)
hosts file - %systemroot%/system32/drivers/etc
ipconfig - to display a list of networking details
msconfig - system configuration utility
"powercfg /batteryreport" - to generates a report of battery usage
"powercfg /sleepstudy" - to generates a diagnostic system power transition report
regedit - registry editor
"shutdown /t [seconds] /r" - to restart the system in [seconds]
"shutdown /t [seconds] /s" - to shutdown the system in [seconds]
startmenu - %AppData%\Microsoft\Windows\Start Menu\Programs (for user) | %ProgramData%\Microsoft\Windows\Start Menu\Programs (for everyone)
systeminfo - to displays operating system configuration information
tasklist - displays a list of currently running processes
taskmgr - task manager
CTRL+Shift+Esc - to open task manager
WIN + A - to open the quick settings menu
WIN + D - to display the desktop quickly (minimize all windows and then restore it)
WIN + E - to open explorer
WIN + H - to launch voice typing
WIN + I - to open settings
WIN + K - to open the 'Connect' quick setting
WIN + L - to lock the screen
WIN + M - to minimize the opened windows
WIN + N - to open notification panel/monthly calendar panel
WIN + Q or S - to open one-click search
WIN + R - to launch run
WIN + T - to cycle through apps in the taskbar
WIN + V - to open clipboard history
WIN + W - to open news and interests feed
WIN + X - to open the start button context menu
WIN + . [period] - to open the emoji panel
WIN + Spacebar - to switch input method
WIN + Ctrl + D - to create a new virtual desktop
WIN + PrtScn - to take a screenshot
WIN + Shift + S - to take a customized screenshot (with additional options)
Windows Sandbox (installation guide)
Info and Discussion at Microsoft Tech Community
1. Install Windows 10/11 Pro or Enterprise
2. Enable virtualization settings in the BIOS
3. Use the search bar on the task bar and type "Turn Windows Features on or off" to access the Windows Optional Features tool. Select "Windows Sandbox". Restart the computer if you're prompted.
4. Using the Start menu, find Windows Sandbox, run it and allow the elevation
5. You can use copy and paste function to transfer files between the host and the sandbox
6. Run the executable in the Windows Sandbox; if it is an installer go ahead and install it
7. Run the application and use it as you normally do. If you don't encounter any issue and the program works just fine, than you can install it on your system. If you find issues running or crack/patch not working, or feel some lags or adware or hack issues on that sandbox, than don't install the software on main system.
8. When you’re done experimenting, you can simply close the Windows Sandbox application. All sandbox content will be discarded and permanently deleted
Windows - Repair/Fix Windows
1. Open Command Prompt/Powershell with Admin Privilege
2. Recommended to run in this order one line at a time.
SFC /scannow
DISM /online /cleanup-image /checkhealth
DISM /online /cleanup-image /scanhealth
DISM /online /cleanup-image /restorehealth
SFC will verify the integrity of operating system files & repair files that are corrupt, damaged or changed.
DISM will run an advanced scan and repair any problems automatically. It creates a log file (%windir%/Logs/CBS/CBS.log) that captures any issues that the tool found or fixed.
checkhealth: Checks if corruption has already been flagged in the registry. It is very fast and does not perform repairs.
scanhealth: Performs a deep scan of the component store (WinSxS folder) for corruption. It takes longer than /CheckHealth but is more thorough.
restorehealth: Scans for corruption and automatically repairs issues by downloading good files from Windows Update.
Windows - This is no longer located in...Verify the item 's location and try again;
1. Open Command Prompt/Powershell with Admin Privilege
2. Paste the following command in the command prompt rd /s \\?\"C:\bad\folder\path"
3. Replace "C:\bad\folder\path" with the folder or file's path.
Windows 10 - Show Seconds In System Clock
Download this set of registry files to enable/disable 'seconds' display. file
Windows 11 - Tips
Bypass Bloatware Being Install at First Boot
During setup, in 'Time and Currency format', select 'English (World)' or 'English (Europe)'
Note: You may encounter errors during the out-of-box experience, and you may see the “Something went wrong” error as the wizard tries to load the region settings. You can always use the “Skip” button to bypass the error.
Bypass MS Account During Setup #1
1. At the first screen of the setup, select "Set up for work or school" instead of "Set up for personal use".
2. On the next screen, click "Sign-in options" and then "Domain join instead".
3. Follow the prompts to create a local username and password.
Bypass MS Account During Setup #2
1. Disconnect your computer from the internet (unplug the Ethernet cable or turn off Wi-Fi) before you begin the installation process.
2. Proceed with the setup until you reach the network connection screen.
3. Press Shift + F10 (or Fn+Shift+F10 on some laptops) to open Command Prompt.
4. Type oobe\bypassnro or start ms-cxh:localonly and press Enter. The computer may restart.
5. When setup resumes, you will have the option to select "I don't have internet" to create a local account.
Bypass MS Account During Use (if asked)
1. Press Ctrl+Shift+Esc (opens Task Manager)
2. Find 'Search', right click and 'End task' this process.
Bypass TPM 2.0 Check
1. Install Windows 11 using the ISO file
2. Once you arrive at a screen which says "This PC can't run Windows 11", press Shift+F10. Command Prompt will be launched
3. Type regedit to open the Windows Registry Editor
4. In there, navigate to HKEY_LOCAL_MACHINE\SYSTEM\Setup, right click on the Setup key and select New > Key
5. When prompted to name the key, enter LabConfig and press enter
6. Now right-click on the LabConfig key and select New > DWORD (32-bit) value and create a value named BypassTPMCheck, and set its data to 1. Now create the BypassRAMCheck and BypassSecureBootCheck values and set their data to 1 as well.
7. Once you have created the three values, close the registry editor. Type exit in the command prompt.
8. Now you are back at the "This PC can't run Windows 11" screen. Click on the back button on the top left of the windows.
9. You will now be back at the screen prompting you to select the version of Windows 11 you wish to install. You can now continue with the setup, and the hardware requirements will be bypassed, allowing you to install Windows 11.
Error: We didn't find any updates that are published for your edition at this time
Try "Pauce for 1 week", then unpause and search for update.
Windows 11 - Turn Off Settings for New Install
Disable Fast Startup | Also for Win10
When Fast Startup is enabled and a user shuts down the computer, all sessions are logged off, and the computer enters hibernation. This has caused many issues, specifically when it comes to Windows or driver updates.
Big thing to remember. In general, if something changes on your system and the thing that performed the change recommends you restart your computer. You should restart before the next shutdown. This way those changes can take effect helping ensure the next hibernate is successful. After all, there is a reason for requiring you restart after the installation or update completes.
1. Open 'Control Panel\System and Security\Power Options'
2. From the left pane, open 'Choose what the power buttons do'
3. Open 'Change settings that are currently unavailable'
4. Uncheck 'Turn on fast startup (recommended)'
Disable VBS (Virtualization-based Security) | Will improve your PC performance and battery life
Check if it is enable or not:
-Search for 'System Information' ➜ Left pane under System Summary ➜ right pane, check for a row that says "Virtualization-based security" to see if it's enable or disable
Settings to turn it off:
Settings ➜ Privacy & Security (left pane) ➜ Windows Security (under Security) ➜ Device security ➜ Core isolation ➜ click the toggle to turn it off, and restart your PC to take effect
Switch off sending optional diagnostic data
1. In your Settings app, go to "Privacy & security"
2. Select "Diagnostics & feedback" under Windows permissions
3. Expand the Diagnostic data menu
4. Turn off "Send optional diagnostic data
5. Expand the "Delete diagnostic data" menu
6. Click on the Delete button to clear any diagnostic data collected
Turn off personalized ads
1. Launch the Settings app
2. Open the "Privacy & security" tab
3. Choose General under "Windows permissions
4. Turn off the toggle button for "Let apps show me personalized ads by using my advertising ID
| 
