|
Last Update: February 2024

DNS Server (general)
CloudFlare: 1.1.1.1 & 1.0.0.1
[ Private DNS: 1dot1dot1dot1.cloudflare-dns.com | one.one.one.one | https://dns.cloudflare.com/dns-query ]
Google: 8.8.8.8 & 8.8.4.4
[ Private DNS: dns.google | https://dns.google/dns-query ]
DNS Server (with ad filter or more)
AdGuard: 94.140.14.14 & 94.140.15.15
[ Private DNS: dns.adguard-dns.com | https://dns.adguard-dns.com/dns-query ]
doh.tiar.app: (Singapore) 174.138.21.128 & 188.166.206.224
[ Private DNS: dot.tiar.app | https://doh.tiar.app/dns-query ]
doh.tiar.app: (Japan) 172.104.93.80
[ Private DNS: jp.tiar.app | https://jp.tiar.app/dns-query ]
DNS-Over-HTTPS - What and How?
Apple/iOS settings | Android.iOS.Windows.Linux settings
Other Known DNS Providers
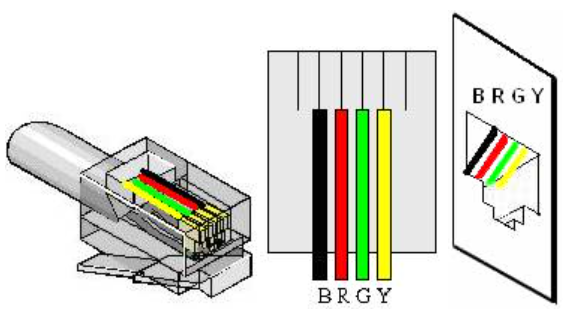
Network Wiring 568A/568B [RJ45] / [RJ11]

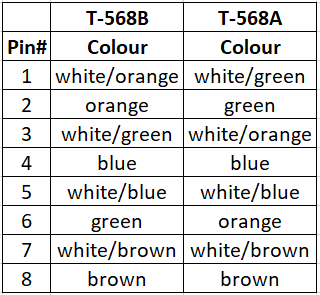
The POTS (Plain Old Telephone Service) residential telephone wiring generally contains two pairs of wires - designed for two separate telephone lines. The center pins (Red and Green) contain the first telephone line.
Automatic Login to Windows
1. Start -> type 'netplwiz'
2. Clear the 'Users must enter a user name and password to use this computer' checkbox
3. In the following dialog box, enter the user’s password twice and click OK
Bring Off-Screen Window Back Onto Screen
Fix 1 - Show Desktop Togger
Hold down the Windows Key, then press “D“. Repeat these steps to see if it makes the window you are looking for reappear.
Fix 2 – Move Option 1
Select the program in the task bar.
Hold the Windows Key while pressing Left Arrow or Right Arrow repeatedly to move the window back into view.
Fix 3 – Move Option 2
Hold down the “Shift” key while right-clicking the program in the taskbar, then select “Move“.
Use your mouse or the arrow keys on your keyboard to move the window back onto the screen.
Command Prompt (good to know commands)
chkdsk - is helpful for diagnosing and repairing disk-related issues
"sfc /scannow" - verify the integrity of operating system files & repair files that are corrupt, damaged or changed
assoc - Displays or modifies file extension associations
"dir /b /s > dirlist.txt" - Displays a list of files and subdirectories in a directory
diskpart - a text-based version of the storage section in the Windows settings app
ipconfig - Display a list of networking details
ping - Test the connectivity between two hosts
"powercfg /batteryreport" - Generates a report of battery usage
"powercfg /sleepstudy" - Generates a diagnostic system power transition report
"shutdown /t [seconds] /r" - Restart the system in [seconds]
"shutdown /t [seconds] /s" - Shutdown the system in [seconds]
systeminfo - This tool displays operating system configuration information
tasklist - This tool displays a list of currently running processes
ver - Display the Windows version
Common Windows Program/Shortcut Windows Key + R to run
cleanmgr - Disk Cleanup
dxdiag - DirectX Diagnostic Tool
msconfig - System Configuration Utility
regedit - Registry Editor
taskmgr - Windows Task Manager (also works with Ctrl+Shift+Esc)
Clipboard History - remember your clipboard history when enabled - Windows Key + v
Emoji Panel - open the emoji panel - Windows Key + . (period)
WIN + A - to open the quick settings menu
WIN + D - to display the desktop quickly (minimize all windows and then restore it)
WIN + E - to open explorer
WIN + H - to launch voice typing
WIN + I - to open settings
WIN + K - to open the 'Connect' quick setting
WIN + L - to lock the screen
WIN + M - to minimize the opened windows
WIN + N - to open notification panel/monthly calendar panel
WIN + Q or S - to open one-click search
WIN + R - to launch run
WIN + T - to cycle through apps in the taskbar
WIN + V - to open clipboard history
WIN + W - to open news and interests feed
WIN + X - to open the start button context menu
WIN + Spacebar - to switch input method
WIN + Ctrl + D - to create a new virtual desktop
WIN + PrtScn - to take a screenshot
WIN + Shift + S - to take a customized screenshot (with tools)
Edge Browser - create URL shortcut
1. Right click on desktop, click New, click Shortcut
Default location:
Stable: "C:\Program Files\Microsoft\Edge\Application\msedge.exe"
or "C:\Program Files (x86)\Microsoft\Edge\Application\msedge.exe"
Beta: "C:\Program Files\Microsoft\Edge Beta\Application\msedge.exe"
or "C:\Program Files (x86)\Microsoft\Edge Beta\Application\msedge.exe"
Dev: "C:\Program Files\Microsoft\Edge Dev\Application\msedge.exe"
or "C:\Program Files (x86)\Microsoft\Edge Dev\Application\msedge.exe"
2. Enter URL after the above link in the location box/field. ie "C:\Program Files\Microsoft\Edge\Application\msedge.exe" http://etplanet.com
Restart / Shutdown via Task Scheduler
Ways to open Task Scheduler:
1a. Windows key + R to open the Run command. Type taskschd.msc and press enter.
1b. Windows key + S to open Search. Type Task Scheduler and click open.
Once you got Task Scheduler to open.
2. Right-click on the Task Scheduler Library and select New Folder. Name the new folder as Schedule Reboot or anything you like and click OK.
3. Expand Task Scheduler Library and select the Schedule Reboot folder. Then right-click on it and select Create Basic Task.
4. When you select Create Basic Task, it will open a wizard. Name it Reboot and click Next.
5. The Trigger section lets you decide when your task needs to be run. You can schedule reboot daily, one time, weekly, etc. Select daily and click next.
6. Specify the time at which you want to run the reboot and click Next.
7. In the Action section, select Start a program and click Next.
8. Type shutdown /r in program/script field and click Next. (other commands are listed above)
9. Windows may prompt a message box asking for permission. Click yes.
10. Click Finish to complete the task.
Start Menu folders
There're actually 2 locations for Start menu items.
%AppData%\Microsoft\Windows\Start Menu\Programs
%ProgramData%\Microsoft\Windows\Start Menu\Programs
The first one contains all Start menu entries for software installed "For me only". The second one contains everything installed "For everyone".
Windows Hosts File Located at %systemroot%/system32/drivers/etc
Note: Must open Notepad with administrator privileges to edit and save the file
1. Start, type 'notepad', press Ctrl+Shift+Enter
2. Browse to the above directory and open the file 'hosts'
3. Make your changes and save.
Recommend HOSTS list: http://winhelp2002.mvps.org/hosts.htm
Windows Sandbox (installation guide)
Info and Discussion at Microsoft Tech Community
1. Install Windows 10/11 Pro or Enterprise
2. Enable virtualization settings in the BIOS
3. Use the search bar on the task bar and type "Turn Windows Features on or off" to access the Windows Optional Features tool. Select "Windows Sandbox". Restart the computer if you're prompted.
4. Using the Start menu, find Windows Sandbox, run it and allow the elevation
5. You can use copy and paste function to transfer files between the host and the sandbox
6. Run the executable in the Windows Sandbox; if it is an installer go ahead and install it
7. Run the application and use it as you normally do. If you don't encounter any issue and the program works just fine, than you can install it on your system. If you find issues running or crack/patch not working, or feel some lags or adware or hack issues on that sandbox, than don't install the software on main system.
8. When you’re done experimenting, you can simply close the Windows Sandbox application. All sandbox content will be discarded and permanently deleted
Windows Storage Spaces
Can I remove a drive from a Windows 10 mirrored storage space drive pool without replacing it?
FAQ
| Virtualizing Storage
Windows - Installation without Bloatware
Choose the “English (World)” or “English (Europe)” option from the “Time and Currency format” setting during setup.
Quick note: You may encounter some errors during the out-of-box experience, and you may even see the “Something went wrong” error as the wizard tries to load the region settings. You can always use the “Skip” button to bypass the error.
Windows - Repair/Fix Windows
1. Open Command Prompt/Powershell with Admin Privilege
2. Usually recommend to run at this order. One line at a time.
SFC /scannow
DISM /Online /Cleanup-Image /CheckHealth
DISM /online /cleanup-image /scanhealth
DISM /online /cleanup-image /restorehealth
SFC will verify the integrity of operating system files & repair files that are corrupt, damaged or changed.
DISM will run an advanced scan and repair any problems automatically. It creates a log file (%windir%/Logs/CBS/CBS.log) that captures any issues that the tool found or fixed.
Windows 10 - Show Seconds In System Clock
Download this set of registry files to enable/disable 'seconds' display. file
Windows 11 - Disable VBS (Virtualization-based Security)
Check if it's enable or not:
First you need to open System Information. Under System Summary, check for a row that says "Virtualization-based security." If it says "Not Enabled," you don't need to do anything else.
Option 1:
The first is to open Settings, click on Privacy & Security on the left pane, and you'll be greeted by a list of security features, Windows permissions, and App permissions. Click on the top one that says "Windows Security," and then click on Device security from the list that appears after that. Then click on "Core isolation details," which should be colored. This leaves you with a toggle for "Memory Integrity," which you need to turn off and restart your PC for it to take effect.
Option 2:
It is done via the Registry Editor. You can open by searching for its name from the Taskbar or by hitting Windows + R and entering 'regedit' in the text box -- click OK.
On the window that appears, there's an address bar that you can use to navigate directly to "HKEY_LOCAL_MACHINE\System\CurrentControlSet\Control\DeviceGuard." On the right pane you should see a DWORD value called "EnableVirtualizationBasedSecurity." Open that and set it to "0." Restart your PC for the change to take effect.
Windows 11 - Bypass MS Account During Setup
1. Select Sign-In when asked to create or sign-in to a Microsoft account during setup
2. Use the email address no@thankyou.com
3. Type any password on the next screen
4. Windows will display "Oops, something went wrong" on the next screen
5. Clicking Next opens a screen that allows you to create a local account
6. You can assign a password to the account or leave it empty
Windows 11 - Bypass MS Account During Setup - Older option
1. On wifi setup screen, press Shift+F10 to open command prompt
2. Type "oobe \bypassnro"
3. The setup will restart and you will be able to continue setup with internet access
Windows 11 - Bypass MS Account During Use (if asked)
1. Press Ctrl+Shift+Esc (opens Task Manager)
2. Find 'Search', right click and 'End task' this process.
Windows 11 - TPM 2.0 Bypass During Install
1. Install Windows 11 using the ISO file
2. Once you arrive at a screen which says "This PC can't run Windows 11", press Shift+F10. Command Prompt will be launched
3. Type regedit to open the Windows Registry Editor
4. In there, navigate to HKEY_LOCAL_MACHINE\SYSTEM\Setup, right click on the Setup key and select New > Key
5. When prompted to name the key, enter LabConfig and press enter
6. Now right-click on the LabConfig key and select New > DWORD (32-bit) value and create a value named BypassTPMCheck, and set its data to 1. Now create the BypassRAMCheck and BypassSecureBootCheck values and set their data to 1 as well.
7. Once you have created the three values, close the registry editor. Type exit in the command prompt.
8. Now you are back at the "This PC can't run Windows 11" screen. Click on the back button on the top left of the windows.
9. You will now be back at the screen prompting you to select the version of Windows 11 you wish to install. You can now continue with the setup, and the hardware requirements will be bypassed, allowing you to install Windows 11.
Windows 11 - Remove unsupported PC watermark
1. Click on the Start menu and type Registry Editor and open it
2. Expand HKEY_CURRENT_USER
3. Navigate to and expand Control Panel
4. Click the UnsupportedHardwareNotificationCache folder
5. In the accompanying window pane, right-click the SV2 entry and select Modify
6. Change the value to "0" then click OK
7. Reboot your PC
Windows 11 - Turn Off Settings for New Install
Switch off sending optional diagnostic data
1. In your Settings app, go to "Privacy & security"
2. Select "Diagnostics & feedback" under Windows permissions
3. Expand the Diagnostic data menu
4. Turn off "Send optional diagnostic data
5. Expand the "Delete diagnostic data" menu
6. Click on the Delete button to clear any diagnostic data collected
Turn off personalized ads
1. Launch the Settings app
2. Open the "Privacy & security" tab
3. Choose General under "Windows permissions
4. Turn off the toggle button for "Let apps show me personalized ads by using my advertising ID
| 